photo credit: Greg McMullin via photopin cc
Bono.
Now that I've bought a Raspberry Pi and am up to SSH connectivity, I'll summarize how to do it.
What to prepare
- raspberry pie
- SD Card: Transcend Japan TS16GSDHC10E 16GB Class 10
- Monitor: ASUS VE198T 19-inch
- Keyboard: hp KB-0133
- WiFi dongle: BUFFALO WLI-UC-GNM
- USB cable: Manufacturer unknown E334062
- HDMI cable: Manufacturer and model unknown
Obtain an OS
Download img file
The OS used was Raspbian, one of the many operating systems used.
This is because it was the most used in several books and websites.
There are two ways to download it from Raspbian in the OPERATING SYSTEM IMAGES section of the following website.
Be warned, it takes a very long time to download either way. In my case, it took about 5 hours.
Download the file from "Download ZIP".
We just have to wait patiently. Was it because I lost my internet connection in the middle of the process? I had to start over several times because it cut me off in the middle of downloading.
Download from "Download Torrent".
Since this is a torrent file, the download is instantaneous.
But beyond that is a bit of a hassle.
Load a torrent file usingBitTorrent orμTorrent® (uTorrent) - a (very) lightweight BitTorrent client, and it will download the zip file that it contains.
It also takes a tremendous amount of time. Moreover, I had a hard time understanding how to use it.
Burn OS to SD card
First, use the following command to see the status of the disk.
[crayon] diskutil list[/crayon]
You should see /dev/disk0, /dev/disk1, etc. as shown below.
[crayon] /dev/disk1: TYPE NAME SIZE IDENTIFIER
0: CD_partition_scheme *154.1 MB disk1
1: Apple_partition_scheme 134.2 MB disk1s0
2: Apple_partition_map 1.0 KB disk1s0s1
3: Apple_HFS EMOBILE GL06P 28.6 MB disk1s0s2
[/crayon]
Here, the non-Macintosh is the SD card.
Then unmount. diskX is the number of the slot where the SD card is stuck.
[crayon] diskutil unmount /dev/diskX[/crayon]
Next, burn the img file to the SD card.
XXXX.img should be the name of the file actually downloaded.
[/crayon]
Note that downloading img files takes time, so it is recommended to keep the img files once downloaded for future use.
Booting up the Raspberry Pi
Start the Raspberry Pi according to the following procedure.
- Connect all prepared items.
- Insert SD card with OS burned into Raspberry Pi
- Turn on the power
- A loading screen appears on the monitor.
- You will be asked for your login ID and password, enter the following
Login ID:pi
Password:raspberry
Then proceed with the following settings.
Various settings
keyboard setup
See the following site. Support Japanese keyboard. If you don't do this first, it will be very hard to work afterwards.
Installing and initially configuring the OS on a Raspberry Pi
Auto Login Settings
With the default settings, the user is asked for a user name and password each time it is started.
To save time and effort, set the system to log in automatically next time.
Auto Login for Raspberry Pi | Making Mugbot
This automatic configuration is also required when using the Raspberry Pi as a gadget, so it is good to keep it in mind.
Network Configuration
This can be easily done using the WiFi config software that comes by default with the Raspberry Pi.
First, use the following command to display the desktop screen.
[crayon] startx[/crayon]
There is a software called WiFi config on the desktop screen, launch it and register the router you are using.
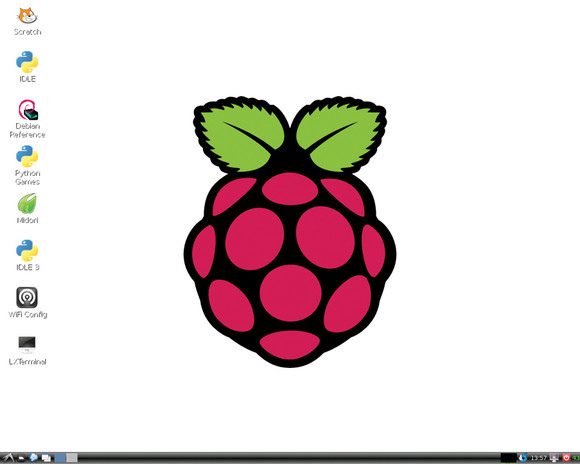
photo credit: xmodulo via photopin cc
SSH connection settings
First, enter the following command to launch the configuration screen.
[crayon] raspi-config[/crayon]
Under "ssh," select enable and press OK.
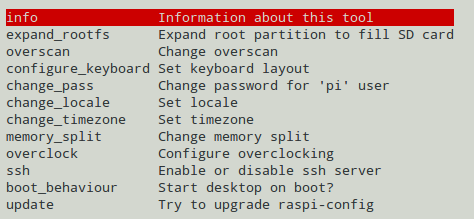
photo credit: Álvaro Reig González via photopin cc
Basically, this is as far as the setup goes.
However, I needed additional wireless LAN settings for my WiFi router, as described below.
Wireless LAN Settings
Unable to make SSH connection,,
In my environment, I use pocket WiFi.
To conclude first, when using pocket WiFi, the default setting was set to not allow SSH connections to PCs in the network.
Saved by Yahoo! Wisdom Bags
I found exactly the right answer in Yahoo Chiebukuro.
I am trying to use ssh to study linux, but it is not working. - Yahoo! Wisdom Bags
The solution is as follows.
Frequently Asked Questions | EMOBILE
This thing called privacy separator needs to be turned off.
How to turn off the privacy separator in pocketWiFi
Open your browser and go to http://192.168.13.1/にアクセス
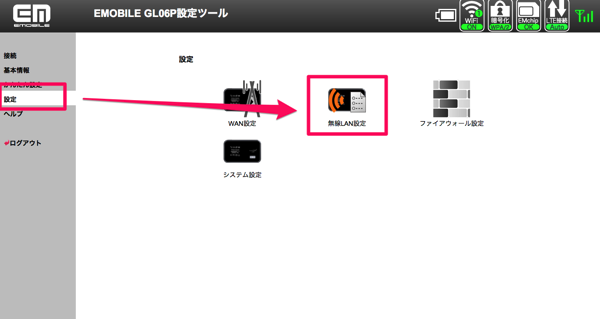
Click on Wireless LAN Settings
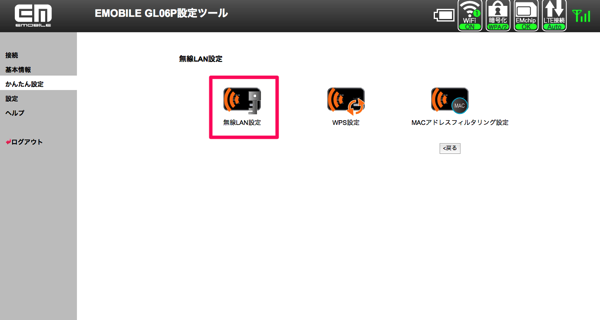
Privacy separator set to disabled
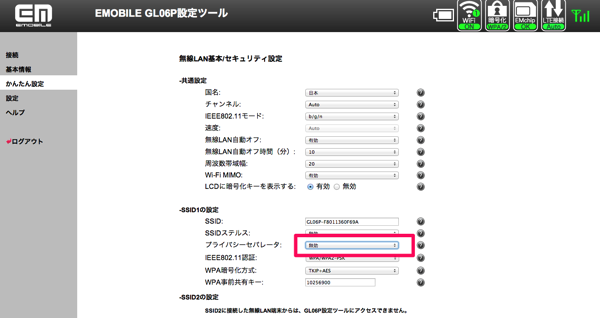
Finally.
Then, SSH connection is completed by issuing the following command from a PC in the network.
Here, IP address is the IP address of the Raspberry Pi.
[/crayon]
The following command can be used on Raspberry Pi to check if a network connection is established.
[crayon] ifconfig[/crayon]
extra (theatrical)
There are several commands to check the network, such as arp, telnet, traceroute, and ping.
The following sites may be used as a reference for confirmation, which would be approximately exhaustive.
The case of ssh disconnected (resolved) - kinneko@Diary of a new job seeker
The following book was used as a reference for wireless LAN settings and OS burning.
 Start electronics

