 photo credit: ak_tokyo via photopin cc
Good evening, this is Bono.
I’m slowly getting used to creating iPhone apps that don’t use Interface Builder or Story Board. There are still a lot of “why do we need this? There are still a lot of codes that are like, “Why do we need this?
Incidentally, this time I wanted to create an application that combines TabBar and NavigationBar.
When I googled, I found many sites that implemented NavigationBar or TabBar with just code, but I could find few that implemented these in combination.
Leave it for future use.
How to create an application combining TabBar and NavigationBar
Prepared classes
Prepare the following 6 pieces.
- AppDelegate: Overall management
- MainViewController: Tab screen Main
- SubViewController: Tab screen Sub
- SetViewController: Navigation screen Top
- Item1ViewController: Navigation screen hierarchy 1
- Item2ViewController: Navigation screen hierarchy 2
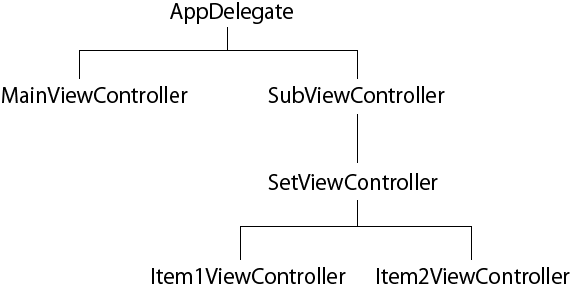
The tree looks like this.
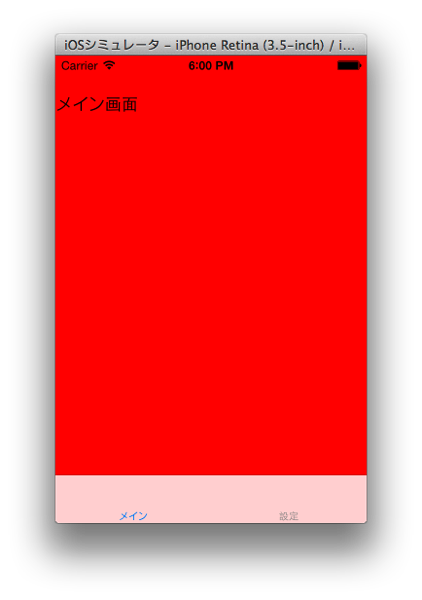
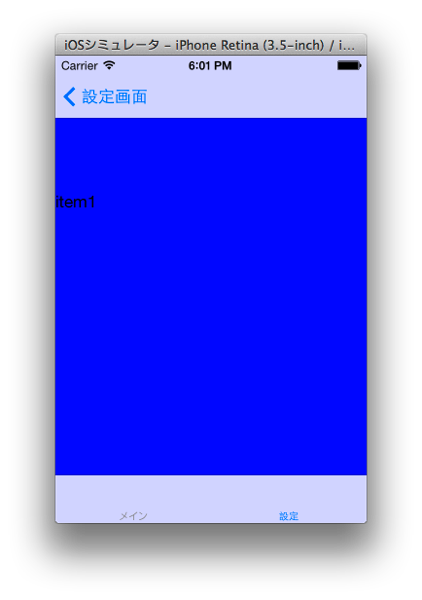
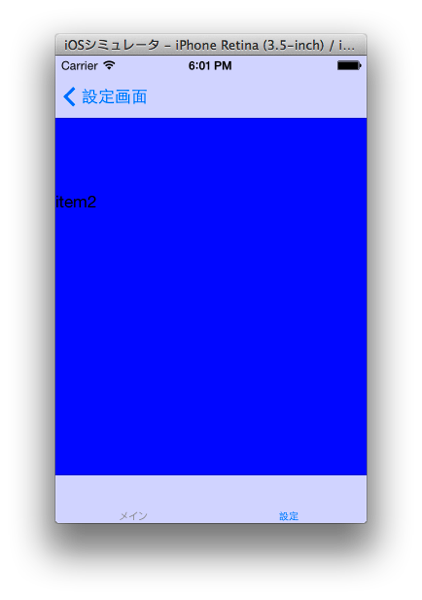
Completion image
Tab screen Main
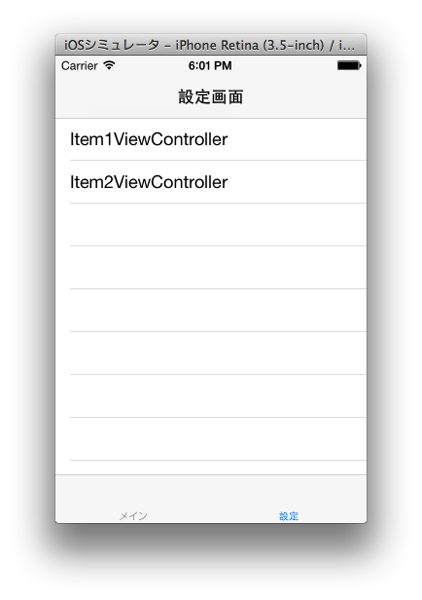
Tab screen Sub ( = Navigation screen Top)
Navigation screen hierarchy 1
Navigation screen hierarchy 2
Code to achieve
Feel free to use the code below as a template.
Incidentally, the operation has been confirmed with the combination of Xcode 5.0 and iOS7.
AppDelegate.h
@interface AppDelegate : UIResponder <UIApplicationDelegate> {
    UIWindow *window;
}

@property (strong, nonatomic) UIWindow *window;
AppDelegate.m
#import "AppDelegate.h"
#import "MainViewController.h"
#import "SubViewController.h"

@implementation AppDelegate

@synthesize window;

- (BOOL)application:(UIApplication *)application didFinishLaunchingWithOptions:(NSDictionary *)launchOptions
{
    window = [[UIWindow alloc] initWithFrame:[[UIScreen mainScreen] bounds]];
    // Override point for customization after application launch.
    window.backgroundColor = [UIColor redColor];

    UITabBarController *rootController = [[UITabBarController alloc]init];
    MainViewController *mainViewController = [[MainViewController alloc]initWithNibName:nil bundle:nil];
    SubViewController *subViewcontroller = [[SubViewController alloc]initWithNibName:nil bundle:nil];
    rootController.viewControllers = [NSArray arrayWithObjects:mainViewController, subViewcontroller, nil];

    mainViewController.tabBarItem = [[UITabBarItem alloc]initWithTitle:@"メイン" image:nil selectedImage:nil];
    subViewcontroller.tabBarItem = [[UITabBarItem alloc]initWithTitle:@"設定" image:nil selectedImage:nil];
    rootController.selectedIndex = 0;

    [window setRootViewController:rootController];
    [window makeKeyAndVisible];

    return YES;
}
MainViewController.h
#import <UIKit/UIKit.h>

@interface MainViewController : UIViewController

@end
MainViewController.m
#import "MainViewController.h"

@interface MainViewController ()

@end

@implementation MainViewController

- (id)initWithNibName:(NSString *)nibNameOrNil bundle:(NSBundle *)nibBundleOrNil
{
    self = [super initWithNibName:nibNameOrNil bundle:nibBundleOrNil];
    if (self) {
        //ツールバーの表示
        UILabel *label = [[UILabel alloc]initWithFrame:CGRectMake(0, 0, 200, 100)];
        label.text = @"メイン画面";
        [self.view addSubview:label];
    }
    return self;
}

@end
SubViewController.h
#import <UIKit/UIKit.h>

@interface SubViewController : UIViewController {
    UIViewController *rootController;
}

@property (strong, nonatomic) UIWindow *window;

@end
SubViewController.m
#import "SubViewController.h"
#import "SetViewController.h"

@interface SubViewController ()

@end

@implementation SubViewController

@synthesize window;

- (id)initWithNibName:(NSString *)nibNameOrNil bundle:(NSBundle *)nibBundleOrNil
{
    self = [super initWithNibName:nibNameOrNil bundle:nibBundleOrNil];
    if (self) {
        // Custom initialization
        SetViewController *setViewController = [[SetViewController alloc]init];
        rootController = [[UINavigationController alloc]initWithRootViewController:setViewController];
        [self.view addSubview:rootController.view];
    }
    return self;
}

@end
SetViewController.h
#import <UIKit/UIKit.h>

@interface SetViewController : UITableViewController {
    @private NSMutableArray *items;
}

@end
SetViewController.m
#import "SetViewController.h"

@interface SetViewController ()

@end

@implementation SetViewController

- (id)initWithStyle:(UITableViewStyle)style
{
    self = [super initWithStyle:style];
    if (self) {

        // Custom initialization
        self.title = @"設定画面";
        items = [NSMutableArray arrayWithObjects:@"Item1ViewController",@"Item2ViewController", nil];
    return self;
}

- (NSInteger)numberOfSectionsInTableView:(UITableView *)tableView
{
    return 1;
}

- (NSInteger)tableView:(UITableView *)tableView numberOfRowsInSection:(NSInteger)section
{
    return [items count];
}

- (UITableViewCell *)tableView:(UITableView *)tableView cellForRowAtIndexPath:(NSIndexPath *)indexPath
{
    static NSString *cellIdentifier = @"Cell";
    UITableViewCell *cell = [tableView dequeueReusableCellWithIdentifier:cellIdentifier];
    if(nil==cell){
        cell = [[UITableViewCell alloc]initWithFrame:CGRectZero reuseIdentifier:cellIdentifier];
    }
    cell.textLabel.text = [items objectAtIndex:indexPath.row];
    return cell;
}

- (void)tableView:(UITableView *)tableView didSelectRowAtIndexPath:(NSIndexPath *)indexPath
{
    Class class = NSClassFromString([items objectAtIndex:indexPath.row]);
    id viewController = [[class alloc] init];
    [self.navigationController pushViewController:viewController animated:YES];
}
Item1ViewController.h
Item1ViewController and Item2ViewController2 are similar, so 1 is listed as a representative.
#import <UIKit/UIKit.h>

@interface Item1ViewController : UIViewController

@end
Item1ViewController.m
#import "Item1ViewController.h"

@interface Item1ViewController ()

@end

@implementation Item1ViewController

- (id)initWithNibName:(NSString *)nibNameOrNil bundle:(NSBundle *)nibBundleOrNil
{
    self = [super initWithNibName:nibNameOrNil bundle:nibBundleOrNil];
    if (self) {
        // Custom initialization
        self.view.backgroundColor = [UIColor blueColor];
        UILabel *label = [[UILabel alloc]initWithFrame:CGRectMake(0, 100, 200, 100)];
        label.text = @"item1";
        [self.view addSubview:label];
    }
    return self;
}
Now it’s done.
Screen transitions are the first hurdle in creating an iPhone application.
I had quite a bit of trouble with it myself, but I’m getting much better at moving it the way I want to.
Although the following book is intended for intermediate level users, it was very useful in deepening my understanding of screen transitions and ViewController.
The code is a bit old, published in 2010, but it is probably the one and only book at this time that explains these principles from the ground up.
It is sufficiently current.
 Start electronics


