
Available on YouTube
*The video demonstrates this on a Mac, but the exact same code can be executed on Windows.
How to make an IOT globe|I understand the flow of prototyping
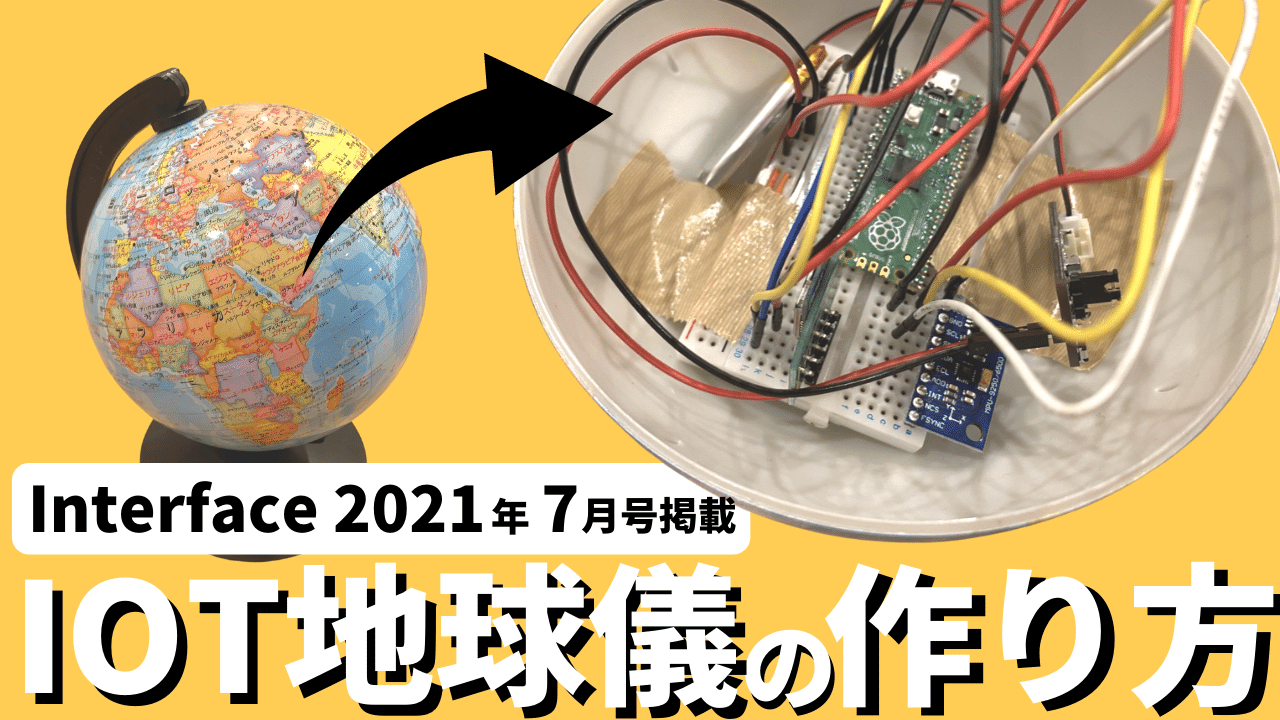
In this issue, we introduce the IOT Globe, which appears in the July 2021 issue of Interface (p. 73-83), published by CQ Publishing.
However, I can’t write too much, so I’ll focus on the points I couldn’t convey in the magazine. If you want to know more, I would be happy if you buy the magazine!
What is IOT Globe?
The IOT globe, as the name suggests, is an IOT version of a globe, a new educational gadget that allows users to visually understand the relationship between the rotation of the earth and the passage of time.
When the globe is rotated one revolution, the image from the fixed-point camera on the browser switches according to the angle of rotation.
(For example, rotating the globe 180° switches the camera image for 12 hours.)
configuration
It consists of the following units
- Microcontroller board: Raspberry Pi Pico
- BLE module: RN4020
- Geomagnetic sensor: GY-9250
- lithium-ion polymer battery
- Lithium-ion polymer battery control board
RaspberryPi Pico is a low-priced device that can be purchased for a single coin, yet it features a small size, coretex M0 dual core, and rich interfaces such as I2C, SPI, and analog inputs. Taking advantage of its small size, we challenged ourselves to make an IOT globe this time.
Background and Objectives
The reason I came up with the idea of “IOT x Globe” was that I bought a globe for my child the other day and thought it would be fun to simply spin it around.
I thought it would be interesting to experience this, since turning the globe represents time going forward and backward in the real world.
The way they are taught in schools today, social studies and science are taught separately, but social studies and science are integrated. In this way, genres that transcend barriers are brought together,
I believe that the “ability to transcend borders” will become a necessary skill for living in the future.
I believe that this is the power we will need to live in the future.
In the same context, various types of globes have appeared in the world recently, such as Doshisha’s talking globe and Almost Day’s Earth Ball.
These have more interactive elements than regular globes and let you rediscover how to enjoy globes.
And the IOT globe goes one step further, by using the globe itself as an interface
By using the globe itself as an interface, you can learn about the relationship between the earth’s rotation and time in a hands-on way.
Products and Principle of Operation
Figure XX shows the IOT globe we made this time. It looks like just a globe, but when you open it up, you will see a breadboard and various boards attached, as shown in the photo.
Since the purpose of this project is a prototype for operation check, it is sufficient if the globe does not shift when it rotates, and is fixed with duct tape.


planning stage
Here I would like to start from the planning and conceptualization stage. This is a very important process in terms of prototyping.
Although this is an essential step in the process of making things, the information available in the world is often already “completed” and the “how it was made” is often hidden from the public. I think there are many people who want to do the same, but don’t know where to start.
Below are some of the idea books I used during the planning process. My favorite software to use when developing ideas are
Evernote and Miro
and I often proceed in 3 steps as follows.
Evernote will be used for STEP 1 and STEP 2.
STEP 1
First, STEP 1 is a complete bludgeoning, with clear requirements,
After clarifying the requirements, the concept and what you want to achieve are written down in words.
The first step is to write down the concept and what you want to achieve.
In this case, a globe in the room caught my eye, and since the RaspberryPi Pico fit perfectly inside, I decided to use the globe as my subject.

STEP2
Once that has been decided, we move on to STEP 2, which is to address the subject of IOT x Globe,
What functions would be interesting? What kind of meaning would you like to give it?
What kind of functionality would you like to see in the IOT x Globe?
This time, we came up with the idea that turning the globe = the act of “advancing/returning time” and decided to tie it to time.
I then had to decide what to output as an output tied to time. I was wondering what I could use as an output, but after doing some research, I found that the webcams.Travel API can retrieve images from cameras around the world,
I thought, “Wouldn’t it be interesting to turn the globe and see a day in the world?
I thought, “Wouldn’t it be fun to turn the globe and see a day in the world?

Figure XX is part of the Miro screen we have created. What components/modules are needed? What needs to be connected to what? What kind of output image do we want? We drew up a diagram to realize these questions little by little.
STEP 3
In the last step, STEP 3, we will discuss
“Is it feasible?
feasibility” of the idea.
No matter how interesting the idea is, it cannot take shape without feasibility, so we are back to square one.
And similarly, “Is the output something I can be excited about?” is also important. No matter how much you can achieve, if it is not something you are excited about, it is obvious that you will fail along the way.
Miro is like a giant whiteboard, with an intuitive interface that allows you to paste an endless number of images and diagrams, making it ideal for this kind of mind-organizing, image-building work.

In this case, I decided to proceed with this idea because it was a system that seemed feasible and the final image was something I could be excited about. At this point, the planning and conceptualization phase is finally complete.
system design
Now, let me explain what we did in the system design.
Again, Miro plays an active role here, creating various patterns to build the optimal system.
Below is the final system overview diagram created for this project.
The system is quite simple,
The RaspberryPi Pico side only sends angle data to the central device (in this case, PC) as a peripheral.
The RaspberryPi Pico is a peripheral sending angle data to the central device (PC in this case).
On the central side, all camera images for a given country or category are loaded in advance in order to use a given location as the basis for GMT time.
Once angle data is received, Javascript is used to create a frame-by-frame video by displaying only the image corresponding to that angle and hiding the rest.

The later part is described in the magazine.
Or if you can watch the YouTube page, I go into a little more detail about the content.
\電子工作歴9年の私のイチ押し!ELEGOOの電子工作キット/