 photo credit: ak_tokyo via photopin cc
こんばんは、ボーノです。
Interface BuilderもStory Boardも使わないiPhoneアプリの作成が少しずつ慣れてきた。 「これ何で必要?」みたいなコードもまだたくさん ありますけど。
ちなみに今回はTabBarとNavigationBarを組み合わせたアプリを作りたかった。
ググってみると、NavigationBarとかTabBarとかをコードだけで実装したサイトはたくさんあったが、これらを組み合わせて実装したものはほとんど見つからなかった。
今後のために残しておく。
TabBarとNavigationBarを組み合わせたアプリの作成方法
用意したクラス
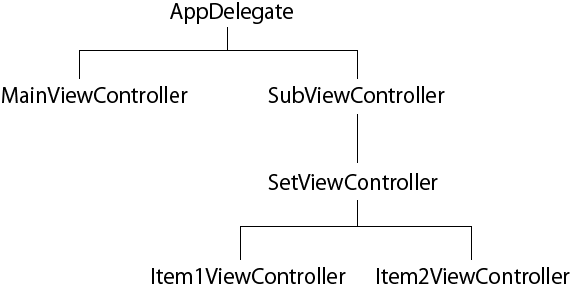
下記の6個を用意。
- AppDelegate:全体管理
- MainViewController:タブ画面Main
- SubViewController:タブ画面Sub
- SetViewController:ナビゲーション画面Top
- Item1ViewController:ナビゲーション画面階層1
- Item2ViewController:ナビゲーション画面階層2
ツリー状にするとこんな感じ。
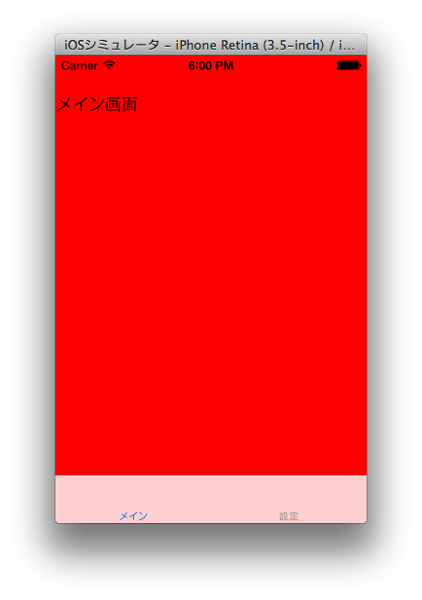
完成イメージ
タブ画面Main
タブ画面Sub ( = ナビゲーション画面Top)
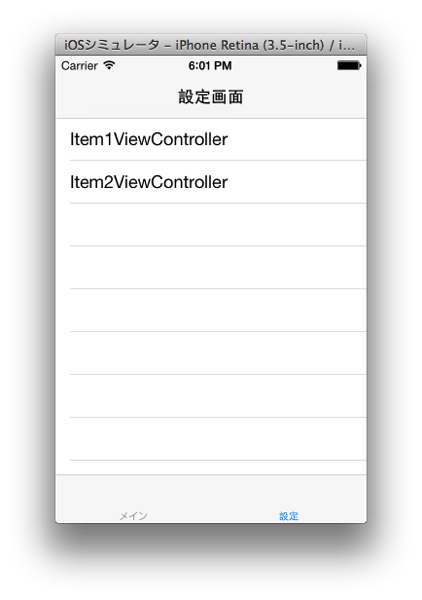
ナビゲーション画面階層1
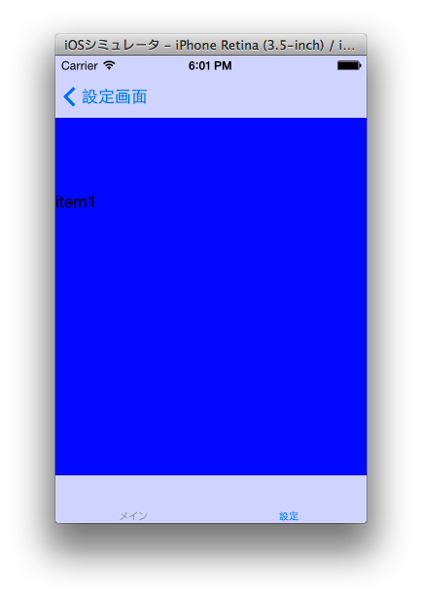
ナビゲーション画面階層2
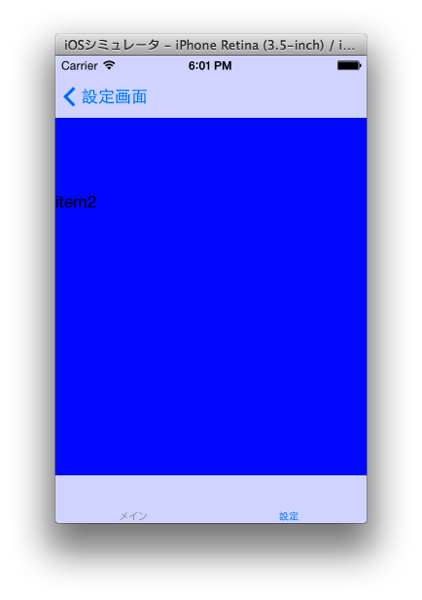
実現するためのコード
下記コードをテンプレートとして自由に使って下さい。
ちなみに、Xcode5.0とiOS7の組み合わせでは動作確認済み。
AppDelegate.h
@interface AppDelegate : UIResponder <UIApplicationDelegate> {
    UIWindow *window;
}

@property (strong, nonatomic) UIWindow *window;
AppDelegate.m
#import "AppDelegate.h"
#import "MainViewController.h"
#import "SubViewController.h"

@implementation AppDelegate

@synthesize window;

- (BOOL)application:(UIApplication *)application didFinishLaunchingWithOptions:(NSDictionary *)launchOptions
{
    window = [[UIWindow alloc] initWithFrame:[[UIScreen mainScreen] bounds]];
    // Override point for customization after application launch.
    window.backgroundColor = [UIColor redColor];

    UITabBarController *rootController = [[UITabBarController alloc]init];
    MainViewController *mainViewController = [[MainViewController alloc]initWithNibName:nil bundle:nil];
    SubViewController *subViewcontroller = [[SubViewController alloc]initWithNibName:nil bundle:nil];
    rootController.viewControllers = [NSArray arrayWithObjects:mainViewController, subViewcontroller, nil];

    mainViewController.tabBarItem = [[UITabBarItem alloc]initWithTitle:@"メイン" image:nil selectedImage:nil];
    subViewcontroller.tabBarItem = [[UITabBarItem alloc]initWithTitle:@"設定" image:nil selectedImage:nil];
    rootController.selectedIndex = 0;

    [window setRootViewController:rootController];
    [window makeKeyAndVisible];

    return YES;
}
MainViewController.h
#import <UIKit/UIKit.h>

@interface MainViewController : UIViewController

@end
MainViewController.m
#import "MainViewController.h"

@interface MainViewController ()

@end

@implementation MainViewController

- (id)initWithNibName:(NSString *)nibNameOrNil bundle:(NSBundle *)nibBundleOrNil
{
    self = [super initWithNibName:nibNameOrNil bundle:nibBundleOrNil];
    if (self) {
        //ツールバーの表示
        UILabel *label = [[UILabel alloc]initWithFrame:CGRectMake(0, 0, 200, 100)];
        label.text = @"メイン画面";
        [self.view addSubview:label];
    }
    return self;
}

@end
SubViewController.h
#import <UIKit/UIKit.h>

@interface SubViewController : UIViewController {
    UIViewController *rootController;
}

@property (strong, nonatomic) UIWindow *window;

@end
SubViewController.m
#import "SubViewController.h"
#import "SetViewController.h"

@interface SubViewController ()

@end

@implementation SubViewController

@synthesize window;

- (id)initWithNibName:(NSString *)nibNameOrNil bundle:(NSBundle *)nibBundleOrNil
{
    self = [super initWithNibName:nibNameOrNil bundle:nibBundleOrNil];
    if (self) {
        // Custom initialization
        SetViewController *setViewController = [[SetViewController alloc]init];
        rootController = [[UINavigationController alloc]initWithRootViewController:setViewController];
        [self.view addSubview:rootController.view];
    }
    return self;
}

@end
SetViewController.h
#import <UIKit/UIKit.h>

@interface SetViewController : UITableViewController {
    @private NSMutableArray *items;
}

@end
SetViewController.m
#import "SetViewController.h"

@interface SetViewController ()

@end

@implementation SetViewController

- (id)initWithStyle:(UITableViewStyle)style
{
    self = [super initWithStyle:style];
    if (self) {

        // Custom initialization
        self.title = @"設定画面";
        items = [NSMutableArray arrayWithObjects:@"Item1ViewController",@"Item2ViewController", nil];
    return self;
}

- (NSInteger)numberOfSectionsInTableView:(UITableView *)tableView
{
    return 1;
}

- (NSInteger)tableView:(UITableView *)tableView numberOfRowsInSection:(NSInteger)section
{
    return [items count];
}

- (UITableViewCell *)tableView:(UITableView *)tableView cellForRowAtIndexPath:(NSIndexPath *)indexPath
{
    static NSString *cellIdentifier = @"Cell";
    UITableViewCell *cell = [tableView dequeueReusableCellWithIdentifier:cellIdentifier];
    if(nil==cell){
        cell = [[UITableViewCell alloc]initWithFrame:CGRectZero reuseIdentifier:cellIdentifier];
    }
    cell.textLabel.text = [items objectAtIndex:indexPath.row];
    return cell;
}

- (void)tableView:(UITableView *)tableView didSelectRowAtIndexPath:(NSIndexPath *)indexPath
{
    Class class = NSClassFromString([items objectAtIndex:indexPath.row]);
    id viewController = [[class alloc] init];
    [self.navigationController pushViewController:viewController animated:YES];
}
Item1ViewController.h
Item1ViewControllerとItem2ViewController2は同様なので代表として1を記載。
#import <UIKit/UIKit.h>

@interface Item1ViewController : UIViewController

@end
Item1ViewController.m
#import "Item1ViewController.h"

@interface Item1ViewController ()

@end

@implementation Item1ViewController

- (id)initWithNibName:(NSString *)nibNameOrNil bundle:(NSBundle *)nibBundleOrNil
{
    self = [super initWithNibName:nibNameOrNil bundle:nibBundleOrNil];
    if (self) {
        // Custom initialization
        self.view.backgroundColor = [UIColor blueColor];
        UILabel *label = [[UILabel alloc]initWithFrame:CGRectMake(0, 100, 200, 100)];
        label.text = @"item1";
        [self.view addSubview:label];
    }
    return self;
}
これで完了
画面遷移はiPhoneアプリの作成において最初のハードルだと思う。
自分もかなり苦労していたが、だいぶ思い通りに動かせるようになってきた。
下記本は中級者向けではあるけど、画面遷移とかViewControllerの理解を深めるのにとても役に立った。
2010年発行ということで少しコードは古いけど、これらの原理を根本から説明した、恐らく現時点においても唯一無二の本だと思う。
十分に現在でも通用する内容です。
 今日から始める電子工作


